It's the holiday season once again, and that means it's time to bulk-mail family photos, personal narratives, and other silly things to our friends, family, and.....well, pretty much everyone we know with a valid mailing address!
Despite the fact that technology for doing mass-mailings has been around for decades, many people still try and do their holiday mailings by hand!!! Not automating a task like this is like forgoing the garden hose to fill your swimming pool with buckets of water from the kitchen sink.You are probably aware that Microsoft Word has the ability to do mailing labels, envelopes, form letters, and other mass-mailing functions, but may not know how to use it. The "mail merge" was one of the first big uses of early personal computers -- so called because you were in essence merging an address database with a word processing document or documents.
This week, I will show you how to use the Mail Merge feature of Microsoft Word to create pages of mailing labels for your holiday envelopes...
1. First, you will need to purchase 8.5"x11" sheets of mailing labels at your local office supply store. The labels can be any size and any number per page, but make sure that there is an "Avery #" that describes the type of labels you purchase. The "Avery #" is a 4-digit number, such as "Avery 5920". You will need this "Avery #" later to tell Microsoft Word what type of labels are in your printer.
2. Open up Microsoft Word and start with a blank document.
3. In the menu bar, go to Tools / Letters and Mailings / Mail Merge...
4. In the right-hand pane that appears in your Microsoft Word window, select Labels, then click Next.
5. Ensure Change document layout is selected, then click Label options...
6. Now, you will need to select your "Avery #" from the scroll box under "Product number". Somewhere in this scroll box, the type of labels you purchased should be listed.
7. Click OK, then click Next.
8. Now you have to tell Word where all your addresses are. There are a lot of different ways of storing addresses on a PC, but two very common ways are using a simple Microsoft Excel spreadsheet or using the Contacts feature of Microsoft Outlook. I will assume you use the former: an Excel spreadsheet.
(If you use the latter, then you'll want to click on Select from Outlook Contacts and then Choose Contacts Folder. Highlight "Contacts" and click OK. Then skip ahead to step 13.)
9. Ensure Use an existing list is selected, then click Browse...
10. Now show Word where your Excel file is located on your hard drive. Browse for it, select it, then click Open.
11. Your Excel file may have more than one worksheet in it. If so, Word will now ask you which worksheet to use. Most likely, you put all your data in the first one, so select the first table. Also, if you put a "header row" in your spreadsheet (a row of column titles, like "Last Name", "First Name", "Street", "City", "State", etc.), check the box next to "First row of data contains column headers".
12. Click OK. Now a new dialog box appears...let's take a look at it:

14. Now examine each row. Un-check boxes for people you don't want to print a label for. Microsoft Word does not care why you don't want to send Christmas cards to these people. Perhaps you are upset with this person because he or she has insulted your car, or failed to invite you to a private book burning, or given you a serious but treatable venerial disease. No matter the case, Microsoft Word respects your decision to leave them out of your mail merge. It will not broadcast your decision over the Internet, nor will it ask "Are you sure?" like other applications might.
15. Seriously, though, you may find rows in this list of bogus or nonsensical data. You might as well un-check the boxes for these rows as well, as they will only waste labels. Once your check boxes are the way you want them, click OK, and this dialog box finally disappears.
16. Click Next.
17. Now click Address block...
18. In the "Insert Address Box" dialog box that appears, you can now customize the way the names and addresses will be presented:
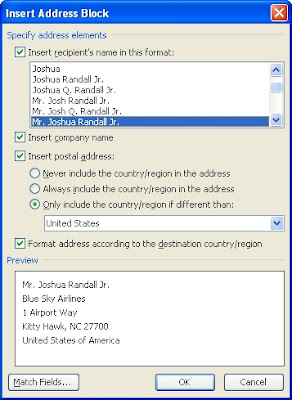
In the first drop-down box, select how you want the names to appear. Then you might want to uncheck the box next to "Insert company name" unless these are business contacts receiving your mailing. The last two check boxes should probably remain checked.
19. Now click the Match Fields... button. Another dialog box pops up:
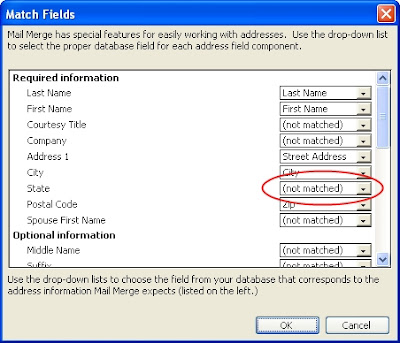
20. Carefully look through this list of fields. This is where Word tries to match up address fields with the columns in your address data. A lot of times it has to guess, and it is not a very good guesser. For instance, in the above example, you can see that Word was unable to determine which column was the "State" column in my Excel address list. To correct this, you simply click on the down-arrow next to the incorrect guess (in this case, it says "(not matched)") and select the correct column from the drop-down box. When all the important fields (Street, City, State, ZIP, etc.) are correct, click OK.
21. Now click OK again, and now you should see that "<22. Back to the right-hand pane we go! Click the Update all labels button. Now the "<
24. Click Next.
25. Click Edit individual labels...26. Make sure All is selected, then click OK.
27. You now have a new Word document with all of your labels on it ready to go! Do yourself a favor and save it now before you make any tweaks to it.28. You may want to change the font to something more interesting. If so, simply hit CTRL-A to select the whole document, then change the font to something festive. I like "Viner Hand ITC", myself.
29. Eyeball your labels one by one to ensure the mail merge didn't create any oddities, such as extra spaces, random punctuation, partial addresses, or bogus listings. Also watch out for special/unique circumstances that the mail merge may not have been aware of, such as spouses who have different last names and people who go by their middle name. This is your opportunity to edit and tweak individual labels before you print them.30. Once everything is looking tip-top, save your document and print it out onto your label sheets! Make sure you load the label sheets into the printer correctly. Top-load inkjets generally want them face-up, while bottom-load inkjets want them face-down. Laser printers can be either, but I would wager a guess it probably wants them face-up. If you're not sure, use a marker to write a small "X" on a piece of paper, load it face-up, and print page 1 of your labels on it. If the "X" ends up on the same side as the printed text, then you want to load the label sheets face-up.
31. If you find major errors in your labels, don't fret. You can still go back to the mail merge process you ran earlier. Click back to the other Word window you have open...you'll find your mail merge session still intact:
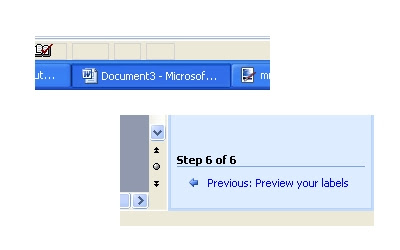 Click on Previous in the right-hand pane to go back through the mail merge process. You can make adjustments, then regenerate labels as many times as you need until you get the labels exactly the way you want.

No comments:
Post a Comment