After using ClientRemote Install from the Symantec Server to upgrade Symantec Antivirus clients to 10.1.4.x, you may find some issues on certain PCs. The user will receive an error box in Outlook that says:
The add-in "C:\Program Files\Symantec Antivirus\vpmsece3.dll" could not be installed or loaded. This problem may be resolved by using Detect and Repair on the Help menu.
Using Detect and Repair won't fix the problem. For the fix, see this article:
http://entkb.symantec.com/security/output/n2004060116454248.html
Please note two things they didn't mention in this article:
1. You'll need to log on as a local administrator or domain admin or you won't be able to find all existing instances of "extend.dat"
2. Ensure that "Search hidden files and folders" is checked-off when you run the search
This fix has worked consistently for us.
18 April 2007
For SysAds: Setting up Office Applications for User-Specific Installations via Group Policy
If you have a limited number of licenses for a particular Microsoft Office application (such as Access, Visio, or Publisher), you can control the number of users that can use that application in Active Directory using a simple security group. However, it takes a few steps in order to get to that point. Here's how you set it up to work that way....
1) In Active Directory in the Users OU at the domain level, create a new Universal Security Group. Call it something like “Visio Users” or “Publisher Users”.
2) On your file server, create a folder in the root of C: and give share and NTFS rights to the security group you created in step 1. This folder will be where the final installation files will reside. We’ll call this our “distribution point”. The security rights should look something like this:

3) Now, you will need to do an “administrative install” of your Office application onto the C: drive of the file server. However, you will not be able to run the administrative install from a network drive. (It won’t work.) So you’ll need to create another (temporary) folder in the C: root directory copy for all of the install files and folders. Call this temporary folder “C:\office2k3pro”.
4) Run the administrative install from your temporary install folder using the Run command with the /a parameter. It should look something like this:

5) When the install runs, in this window, make sure your Install Location is your distribution point that you created in step 2:
1) In Active Directory in the Users OU at the domain level, create a new Universal Security Group. Call it something like “Visio Users” or “Publisher Users”.
2) On your file server, create a folder in the root of C: and give share and NTFS rights to the security group you created in step 1. This folder will be where the final installation files will reside. We’ll call this our “distribution point”. The security rights should look something like this:
3) Now, you will need to do an “administrative install” of your Office application onto the C: drive of the file server. However, you will not be able to run the administrative install from a network drive. (It won’t work.) So you’ll need to create another (temporary) folder in the C: root directory copy for all of the install files and folders. Call this temporary folder “C:\office2k3pro”.
4) Run the administrative install from your temporary install folder using the Run command with the /a parameter. It should look something like this:
5) When the install runs, in this window, make sure your Install Location is your distribution point that you created in step 2:

6) When the administrative installation is complete, be sure to delete your temporary folder “C:\office2k3pro”.
7) Create a Group Policy Object for the application and link it to the appropriate OU. A good naming convention is “[Application Name] [Functional Area]”:

8) For your new GPO, ensure that “Disable Computer Configuration settings” is checked off. It will look like this if you do not have Group Policy Management installed on your workstation:

9) Set security permissions and add the new security group with full control…it will look like this if you do not have Group Policy Management:

10) If you do have Group Policy Management, you will need to go to the “Security Filtering” section under the “Scope” tab to set the security permissions and add the security group:

11) Map a network drive to the C drive share (c$) on the file server.
12) Open up the GPO for editing. Go to User Configuration / Software Settings and right-click on Software installation. Select New / Package… just like so:

13) Browse to the install folder share you created with the administrative install files on the C: drive of the file server via the network drive you just mapped to in step 11.
14) Choose the Assigned deployment method (if you select Published, all users will be get the install):

15) When you finish configuring the software installation piece of the GPO, it should look like this:

16) Now, you can just add users to your security group in Active Directory that need the application and have them reboot!
17) The new application should show up in Start / All Programs / Microsoft Office.
18) Have user run the new application after they receive it; there may be some final pieces of the install that won’t happen until the first time the user runs the application.
Special thanks to Ernie Smith for collaborating on this tech tip.
11 April 2007
Does Everything on Your Monitor Look Too Small?
If so, here's how to reduce the resolution of your screen, causing everything to appear larger.
1. Exit from all applications.
2. Right-click anywhere on your desktop and select Properties.
3. In the box that pops up, click on the Settings tab. It should now look like this:
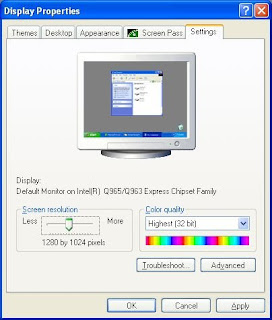
4. Adjust the slider where it says "Screen resolution". If you pull it to the left (towards the word "Less"), everything on your screen will look bigger.
5. NOTE: Do not reduce your resolution to 800x600 pixels! Most websites are designed to display at 1024x768 or greater resolution. Changing your screen resolution to something lower than 1024x768 will cause websites to appear incorrectly.
6. Click the Apply button.
7. The screen will go black and the resolution will change. When the screen reappears, you will get this dialog box:
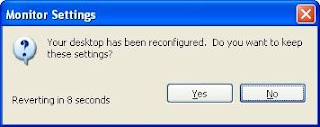
8. Click the Yes button.
9. Click the OK button.
10. You're done!
1. Exit from all applications.
2. Right-click anywhere on your desktop and select Properties.
3. In the box that pops up, click on the Settings tab. It should now look like this:
4. Adjust the slider where it says "Screen resolution". If you pull it to the left (towards the word "Less"), everything on your screen will look bigger.
5. NOTE: Do not reduce your resolution to 800x600 pixels! Most websites are designed to display at 1024x768 or greater resolution. Changing your screen resolution to something lower than 1024x768 will cause websites to appear incorrectly.
6. Click the Apply button.
7. The screen will go black and the resolution will change. When the screen reappears, you will get this dialog box:
8. Click the Yes button.
9. Click the OK button.
10. You're done!
04 April 2007
Get Your Archived Email Back After Switching PCs
1. Make sure you're in Microsoft Outlook.
2. Click on Tools, then click on E-mail Accounts...
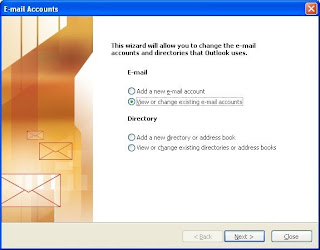
3. In the box that pops up (like the one below), select View or change existing e-mail accounts and click the Next > button.
5. You will now see a box that looks like this:
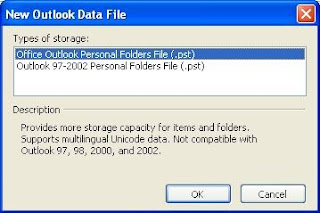
Ensure that the first option is selected ("Office Outlook Personal...") and click the OK button.
6. Now you will be asked to locate the file that contains all of your archived emails. The box will look like this:
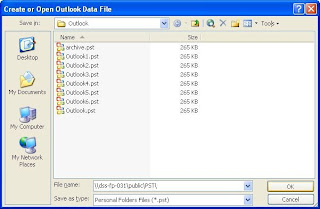
Just like you see above, in the File name: box, type in c:\Documents and Settings\ then hit Enter. Double-click on the folder that corresponds to your username. Double-click on Local Settings. Double-click on Application Data. Double-click on Microsoft. Double-click on Outlook.
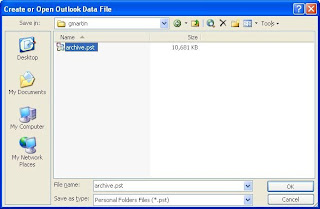
8. Now double-click on the PST file that you see in this folder. It may have a different name than the one in this example:
10. Now click the Finish button and you're done! You'll now see your Archive Folders reappear in the left-hand pane of Microsoft Outlook.
2. Click on Tools, then click on E-mail Accounts...
3. In the box that pops up (like the one below), select View or change existing e-mail accounts and click the Next > button.
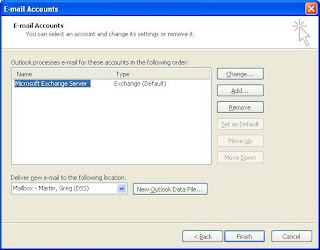
4. In the next box (like the one below), click on the button that says New Outlook Data File...
5. You will now see a box that looks like this:
Ensure that the first option is selected ("Office Outlook Personal...") and click the OK button.
6. Now you will be asked to locate the file that contains all of your archived emails. The box will look like this:
Just like you see above, in the File name: box, type in c:\Documents and Settings\ then hit Enter. Double-click on the folder that corresponds to your username. Double-click on Local Settings. Double-click on Application Data. Double-click on Microsoft. Double-click on Outlook.
8. Now double-click on the PST file that you see in this folder. It may have a different name than the one in this example:
If you see multiple files in this window, you'll need to repeat this procedure for each one of them if you want to see them all in your Outlook.
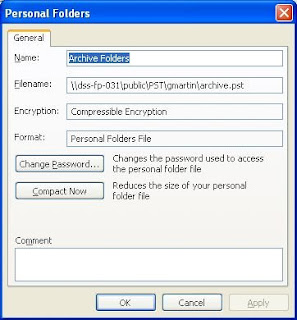
9. Now this box will pop up....just click the OK button:
9. Now this box will pop up....just click the OK button:
10. Now click the Finish button and you're done! You'll now see your Archive Folders reappear in the left-hand pane of Microsoft Outlook.
Subscribe to:
Posts (Atom)
