You know that guy. He's the one who's memorized all the keyboard shortcuts for every application so that he almost never has to touch his mouse. Update linked information in a Word source document? Obviously that's CTRL+SHIFT+F7. Extend a selection or block without reselecting? Just hit CTRL+SHIFT+F8 then an arrow key. Select all Excel cells that contain formulas that directly or indirectly reference the active cell? Easy, it's the ol' CTRL+SHIFT+}. Insert an AutoShape into a PowerPoint slide without using the mouse? Simply press ALT+U, use the arrow keys to select the shape, then press CTRL+ENTER.
If someday all computer mice are determined to cause sudden and violent death, forcing all computer users to throw away their mice, That Guy will be an instant millionaire.
Until then, for the rest of us, there are only about six keyboard shortcuts that are really worth permanently committing brain cells to. These shortcuts are awesome because they're simple, they're easy to remember, and most importantly, they are the same across almost every Windows application available today. Here they are:
SHORTCUT: CTRL+X
FUNCTION: Cut
MNEMONIC: The letter X kind of looks like a pair of scissors, don'tcha think?
SHORTCUT: CTRL+C
FUNCTION: Copy
MNEMONIC: C is for copy, that's good enough for me.
SHORTCUT: CTRL+V
FUNCTION: Paste
MNEMONIC: X, C, and V are all in a row on your keyboard: cut, copy, paste (respectively).
COMMENT: Use these and you'll see how fast you can copy-and-paste or cut-and-paste things (you don't have to look at your fingers to paste). This is particularly handy in Excel.
SHORTCUT: CTRL+A
FUNCTION: Select All
MNEMONIC: A for all!
COMMENT: By far the most underrated shortcut. Sometimes using the mouse to select everything from a large document or long webpage can take a painfully-long time! Instead just put the cursor somewhere in what you want to select and hit CTRL+A!
SHORTCUT: CTRL+S
FUNCTION: Save
MNEMONIC: S for save!
COMMENT: If you memorize and use this shortcut, you'll find yourself saving your work far more often.
SHORTCUT: CTRL+Z
FUNCTION: Undo
MNEMONIC #1: Say it out loud: "Con-trol zee is my fav-o-rite key!"
MNEMONIC #2: Z is the last letter. Undo is your last resort.
COMMENT: Okay, both of these mnemonics are terrible. But make no mistake: Undo is your best friend in the whole wide world. Keep him on speed dial.
Of somewhat less importance than these Awesome Six are three others worth mentioning since they're easy to remember: CTRL+B (boldface), CTRL+I (italicize), CTRL+U (underline).
And here's one last shortcut, since it has big value in Microsoft Internet Explorer: CTRL+N. Hit it and IE will open up another window for you. Not only will the 2nd window show the exact same webpage, but this new window will have your entire webpage history as well. This is incredibly helpful when you need to stay on the webpage you're at but need to simultaneously surf elsewhere...or when you need to surf a couple of different ways from the same webpage. Some examples of when this is handy:
1. You're reading an article and need to look up a word from that article in www.dictionary.com or www.wikipedia.com.
2. You're making a purchase online and want to compare prices after shipping from multiple vendors you found using www.froogle.com, so you do several partial orders on multiple websites.
3. You find a location using www.mapquest.com or maps.google.com. Now you need to get directions to that location for two different people coming from two different starting points.
(CTRL+N actually works in Office applications as well to automaticallly open up a blank new document/spreadsheet/presentation/email/etc., but who really cares?)
They may take a little getting used to at first, but keyboard shortcuts really can ease your workflow tremendously. Who knows...you might even find yourself slowly becoming the next That Guy after all...
31 October 2007
24 October 2007
Good E-mail Habits
This week, I present to you a montage of short tips on how to keep your e-mail inbox manageable and functional.
1. Don't use your Deleted Items folder as a place to store messages that you actually want.
I'm not entirely sure why people do this -- it's sort of like storing important paperwork in the trashcan under your desk. Sooner or later, one of the maintenance guys is going to come around and empty the trash can. Now what? See #2 for a better solution.
2. The best thing to do is create mail folders for you to store messages you need to keep...and I mean lots of folders!
Do this by right-clicking in Outlook's left-hand pane on Mailbox - [Your Name] (for me it's "Mailbox - Martin, Greg") and selecting New Folder.... Type in the name you want to give it and click OK. I really recommend that you make lots of folders. That will make it easy to keep things organized, and easier to find messages you no longer need when it's time to clean things out.
3. Once you've stopped doing what's described in Tip #1, enable automatic Deleted Items emptying.
To do this, go to Tools and click on Options. Click on the Other tab. Now put a check mark next to Empty the Deleted Items folder upon exiting. Click OK. Now, every time you close Outlook (presumably at the end of your work day), Outlook will prompt you if it's okay to empty the wastebasket. You just click Yes when it does this and Outlook will take care of the rest.
4. If you've got hundreds or even thousands of messages in your Inbox, it's time to sort and delete. But don't fret: it's easier than you think.
If you have an ungodly amount of mail in your inbox, the odds are you've got a lot of stuff in there you don't even want.
Here's an easy way to sort those things out. In your Inbox, you'll see a beige bar above all the messages with the e-mail header categories: From, Subject, Received, Size, Flag, etc. These are actually buttons. Click on From or Subject. Now, all of your messages are sorted by either the sender or the subject line. This is very handy, because now all old "Weekly Memo" messages and "Schedule for this week" messages and other outdated mass e-mails are grouped together. It's now easy to just select all those messages that are grouped together and hit the Delete key.
Once that's done, you can also easily file away stuff with everything sorted by sender or subject line. For instance, if a particular person sends you a file (e.g. a summary .DOC file) every week or every month, it should be easy to see all those messages from that one person grouped together. In one motion, you can now select all those messages and drag them into a folder specially-created for these messages.
Once you've weeded out a lot of the junk this way, click the beige Received to return your view to the way it was originally. (If your oldest messages are at the top, click on Received again to reverse the sort order.)
5. Mailbox quotas/limits are based on aggregate message size, not the quantity of messages.
If you're often receiving automated "Mailbox Full" messages, it's not because you have too many e-mails. It's because you have too many large e-mails. In other words, you have too many e-mails with attachments.
What's the solution? Simple. Save the attachments to a folder and then delete the e-mails. To do this, open up the e-mail that has the attachment, go to File, and click Save Attachments.... If there are multiple attachments, you'll see a small dialog box open up listing all the attached files. Click OK. Now navigate to the folder where you want all the attached files to go and click OK. (Save the attachments in your My Documents folder if you need them for yourself; save them to a network folder if you need multiple people to access them.) Done! Now you can delete that large e-mail!
Also, don't forget to check your Sent Items folder for messages with attachments! This folder is the biggest culprit for accumulating large messages that you don't need.
17 October 2007
Rock the Vote!
Outlook has a clever feature that makes it easy for you to take a poll quickly and effortlessly: voting buttons. Here’s how it works:
1. Open up a new mail message in Outlook.
2. In the menu bar, under View, select Options.
3. Here, you can set up a number of intriguing options for your outgoing message. Since we're focusing on voting buttons this week, check the box next to Use voting buttons:
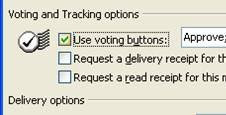
4. There is a drop-down box next to this option. You can select from the default voting choices (Approve or Reject, Yes or No, Yes or No or Maybe), or you can make your own. Making your own is simple: just separate the choices you want to give with semicolons like so:

5. Click the Close button.
6. Compose your email message as normal, perhaps asking the recipients to vote by clicking on one of the buttons they see below their menu bar.
7. Hit Send and off it goes.
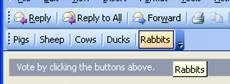
8. Your recipients will receive your email message, and it will contain the voting buttons that you set up in step 4 below the menu bar:
9. All each recipient has to do is click on a button and a reply email with their vote is sent back to you automatically. Super-fast and effortless.
10. Meanwhile, you can track the voting on your computer. Simply open up the message you just sent (it will be in your Sent Items folder). Select the Tracking tab next to the Message tab. Under Tracking, you can see all the people you sent your message to and what they voted for (if they voted), plus what the current tally of each choice is:

1. Open up a new mail message in Outlook.
2. In the menu bar, under View, select Options.
3. Here, you can set up a number of intriguing options for your outgoing message. Since we're focusing on voting buttons this week, check the box next to Use voting buttons:
4. There is a drop-down box next to this option. You can select from the default voting choices (Approve or Reject, Yes or No, Yes or No or Maybe), or you can make your own. Making your own is simple: just separate the choices you want to give with semicolons like so:
5. Click the Close button.
6. Compose your email message as normal, perhaps asking the recipients to vote by clicking on one of the buttons they see below their menu bar.
7. Hit Send and off it goes.
8. Your recipients will receive your email message, and it will contain the voting buttons that you set up in step 4 below the menu bar:
9. All each recipient has to do is click on a button and a reply email with their vote is sent back to you automatically. Super-fast and effortless.
10. Meanwhile, you can track the voting on your computer. Simply open up the message you just sent (it will be in your Sent Items folder). Select the Tracking tab next to the Message tab. Under Tracking, you can see all the people you sent your message to and what they voted for (if they voted), plus what the current tally of each choice is:
10 October 2007
You Spin Me Right Round
There seems to be quite a bit of confusion about CD-ROM drives: which ones can burn CDs, which ones will play DVDs, etc. Hopefully this Tech Tip will eliminate all the confusion.
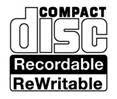
To determine what a CD-ROM drive is capable of, simply look at the front of it. You’ll see one or more logos. This is what they mean:
A lot of DVD “burners” will work with both DVD+R and DVD-R discs. That’s great; just make sure that the program you’re using to burn the new DVD is set to the correct format (DVD+R or DVD-R).
This is important to remember when using video editing software. For instance, when using Pinnacle Studio, you'll need to ensure that the program knows what kind of writeable DVD you've put in the drive:
To determine what a CD-ROM drive is capable of, simply look at the front of it. You’ll see one or more logos. This is what they mean:
| This is the most basic CD-ROM drive. It will read all types of CD-ROMs (the CDs that have computer files on them, like floppy disks). |
| Known as a CD-R drive, this drive will record (a.k.a. “burn”) CDs. Like a floppy disk, you can write files to a recordable CD. Unlike a floppy disk, this is a one-time-only thing. You can't erase what's already been written. Also, it will not record to re-writeable CD-ROMs (“CD-RW” discs). |
| This is a CD-RW drive. It will record CD-R discs as well as re-writeable CD-RW discs. |
   | This drive will play DVDs and it will read DVD-ROMs (those DVDs with files on them -- just like a CD-ROM but 6 times bigger). But it won’t record DVDs. |
 | There are two distinct and completely-incompatible types of “burnable” DVDs: one is called “DVD+R” and one is called “DVD-R”. They both hold the same amount of data and serve the same purpose. This logo signifies the “minus” variety: DVD-R. This drive will record DVD-R discs: both video DVDs you can play on your TV at home, and DVD-ROMs you can save your files on. |
  | Just like a DVD-R drive, but it will also work with re-writeable “minus”-variety DVDs (a.k.a. “DVD-RW” discs). |
 | This is the official logo for the “plus” variety of recordable DVDs. This drive will burn “DVD+R” and “DVD+RW” discs. |
 | This is a somewhat-new format called the “double-layer DVD”. As the name suggests, DVD+R DL discs hold almost twice as much data as standard DVD+R discs. However, the media is hard-to-find and quite expensive. None of the PCs at NECC support this format. |


A lot of DVD “burners” will work with both DVD+R and DVD-R discs. That’s great; just make sure that the program you’re using to burn the new DVD is set to the correct format (DVD+R or DVD-R).
This is important to remember when using video editing software. For instance, when using Pinnacle Studio, you'll need to ensure that the program knows what kind of writeable DVD you've put in the drive:
- Under the Make Movie tab, click on the Settings button.
- Click on the Make Disc tab.
- There is a drop-down box labeled Media:. This is where you specify whether your blank DVD is a DVD-R or a DVD+R.
I have found far greater success with the DVD-R format than with the DVD+R format when trying to burn DVD videos.
03 October 2007
Wherever I May Roam
If you see either of these boxes pop up when you log in...
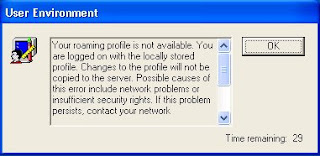
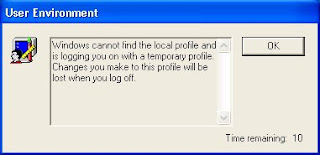
...your IT staff needs to know about it!
It means that for some reason, your roaming profile (which includes your Desktop, your My Documents folder, and your settings) is not getting transferred between the server and the computer you’re working on. You can continue to work at your PC, but your files will not be backed up to the server, and you won’t be able to access your files on any other computer.
Subscribe to:
Posts (Atom)
