Most computers now use optical mice, the ones that have a glowing red light beneath them. These are far more reliable and accurate than their predecessors, the mechanical mice (the ones that ride on a rubber ball).
Most people don’t realize this: an optical mouse doesn’t require a mouse pad. What an optical mouse does require is an opaque surface that is white or light in color. Also, optical mice sometimes have trouble tracking on a perfectly-solid-colored surface.
So if you’re using an all-black mouse pad with your optical mouse, you’re actually diminishing the performance of your mouse, not helping it! (The black mouse pads with the light-gray Dell logo in the center do work reasonably well, though.) In general, we recommend disposal of mouse pads unless a particular desk or keyboard tray surface won’t allow an optical mouse to track well.
Here's another reason to toss out your mouse pad: not only do mouse pads often reduce mouse accuracy, but they are usually loaded with germs and bacteria from years of use…a Petri dish for dirty hands. Using a paper towel, you can apply a small amount of hand disinfectant to the outside of a mouse to kill germs, but mouse pads are best left in the garbage.
03 March 2006
01 March 2006
Make Photos More Manageable
Sometimes digital photos are too big in size and resolution to be practical. Most photos that come straight from a digital camera are over 500 KB in size (roughly half a megabyte). Screen captures can also be pretty huge. Photos this large are usually too awkward for practical use. Not only is it inappropriate to send emails with attachments of more than 1 MB (roughly 1000 KB), large files can take up a ton of space in your profile, greatly slowing down your startup and shutdown times. Plus, inserting several large photos into a Word document will cause your whole computer to drag while trying to edit the document. Under most circumstances, your photos shouldn’t exceed 200 KB.
Here’s a trick I came up with to significantly reduce the size of several images at once. I admit that it is a strange and goofy technique, but I have yet to find a faster way of shrinking multiple photos:
1. Select a group of files (on your computer, in your My Photos folder, on the network, etc.).
2. Right-click on them and select Send To > and then select Mail Recipient. We’re going to pretend to email these photos, but stop short of actually sending them.
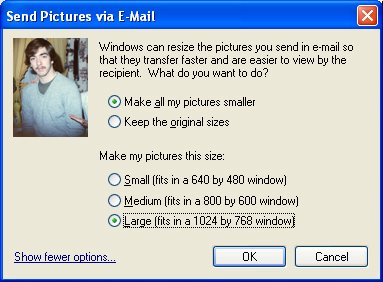
3. A window will pop up, asking you if you want to make the pictures smaller. Click on Show more options...
4. You can now choose one of three resizing schemes. Choose Large. (Medium is good if you’re looking to make postage stamps. Small is great if you're in the microfiche business.) Click OK.
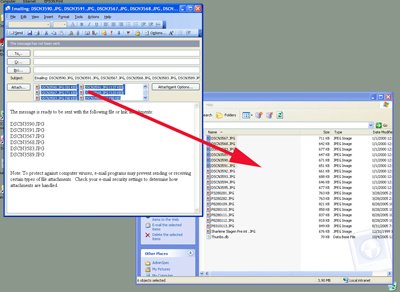
5. A new email message will pop up with your resized photos already attached. We’re not going to send this email. Instead, select all of the photos (you’ll see them next to the Attach... button). Now, drag these resized photos into the folder that holds your original photos.
6. Windows will now ask you if you want to replace each existing file with the new file. Click Yes to All.
7. Close out of the mail message and click No.
Presto! Your photos now take up as little as 1/10th the disk space that they used to! Open up each one…you’ll see that they will still have good resolution and color.
Here’s a trick I came up with to significantly reduce the size of several images at once. I admit that it is a strange and goofy technique, but I have yet to find a faster way of shrinking multiple photos:

1. Select a group of files (on your computer, in your My Photos folder, on the network, etc.).
2. Right-click on them and select Send To > and then select Mail Recipient. We’re going to pretend to email these photos, but stop short of actually sending them.

3. A window will pop up, asking you if you want to make the pictures smaller. Click on Show more options...
4. You can now choose one of three resizing schemes. Choose Large. (Medium is good if you’re looking to make postage stamps. Small is great if you're in the microfiche business.) Click OK.

5. A new email message will pop up with your resized photos already attached. We’re not going to send this email. Instead, select all of the photos (you’ll see them next to the Attach... button). Now, drag these resized photos into the folder that holds your original photos.
6. Windows will now ask you if you want to replace each existing file with the new file. Click Yes to All.
7. Close out of the mail message and click No.
Presto! Your photos now take up as little as 1/10th the disk space that they used to! Open up each one…you’ll see that they will still have good resolution and color.
22 February 2006
Get With The Times!
The 3.5" floppy disk was introduced in 1982, and the 1.44 MB version that exists today was introduced in 1987. Also in 1987, Beverly Hills Cop II was a top-grossing film, president Ronald Reagan's Iran-Contra policy was all over the news, the cost of gasoline was 96 cents per gallon, and people actually looked like this.
Floppy disks have long been made obsolete by writeable CD-ROMs, DVD-ROMs, and USB flash drives. Why? CD-ROMs hold almost 500 times as much data as floppy disks and DVD-ROMs hold over 3000 times as much data. Flash drives hold almost as much data as CDs, are rewriteable just like floppy disks, and transfer data much faster than either format.
More importantly, the failure rate of floppy disks is significant. We've seen as many as 50% of floppy disks fail within the first couple years of use. With odds like that, you'd be safer putting your master's thesis on an Etch-a-Sketch and hoping that we don't have an earthquake.
Not all PCs have a CD "burner", but every PC has at least one USB port that you can plug a flash drive into. Consider purchasing a flash drive -- also known as a "thumb drive", "memory key", or "pen drive" -- and try to limit your use of floppy disks to absolute emergencies. (And for heaven's sakes, back up anything that you save to a floppy disk.)
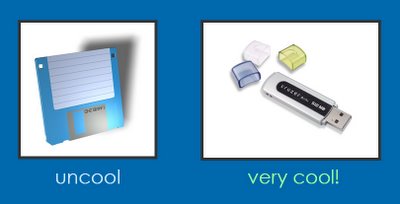
Flash drives are reliable, durable, capacious, and best of all, cheap. Some are as low as $10, and you can find a good one for $30 to $40. Many stores carry them, from Best Buy and Circuit City to Wal-Mart and Target. Or you can use a search site such as www.pricewatch.com to find the lowest prices on the market for flash drives. Computer nerds like to shop on sites such as http://www.newegg.com/ and http://www.tigerdirect.com/. Make sure you look for a flash drive that is at least 128 MB in size (preferably 256 MB or more).
Floppy disks have long been made obsolete by writeable CD-ROMs, DVD-ROMs, and USB flash drives. Why? CD-ROMs hold almost 500 times as much data as floppy disks and DVD-ROMs hold over 3000 times as much data. Flash drives hold almost as much data as CDs, are rewriteable just like floppy disks, and transfer data much faster than either format.
More importantly, the failure rate of floppy disks is significant. We've seen as many as 50% of floppy disks fail within the first couple years of use. With odds like that, you'd be safer putting your master's thesis on an Etch-a-Sketch and hoping that we don't have an earthquake.
Not all PCs have a CD "burner", but every PC has at least one USB port that you can plug a flash drive into. Consider purchasing a flash drive -- also known as a "thumb drive", "memory key", or "pen drive" -- and try to limit your use of floppy disks to absolute emergencies. (And for heaven's sakes, back up anything that you save to a floppy disk.)
Diagram A. Fashion and practicality have never been so in harmony.
Flash drives are reliable, durable, capacious, and best of all, cheap. Some are as low as $10, and you can find a good one for $30 to $40. Many stores carry them, from Best Buy and Circuit City to Wal-Mart and Target. Or you can use a search site such as www.pricewatch.com to find the lowest prices on the market for flash drives. Computer nerds like to shop on sites such as http://www.newegg.com/ and http://www.tigerdirect.com/. Make sure you look for a flash drive that is at least 128 MB in size (preferably 256 MB or more).
15 February 2006
Viewing Multiple Calendars
In Microsoft Office 2003, you can view public calendars alongside your own calendar. Here's how to do it:
- Navigate to a public calendar in the Folder List view. (Select "Public Folders", then select "All Public Folders" to access all the public calendars.)
- Right-click your 'favorite' public calendar in the Folder List and select “Add to Favorites”. Then click “Add”.
- Now go to your Calendar view. (Click on the button below the Mail button.) You’ll notice that in the left pane, the calendar you just added appears under “Other Calendars” with an empty checkbox.
- Check the box for this calendar and it will pop up alongside your own calendar in the middle pane. Uncheck the box to remove it from view.
08 February 2006
Email Flags
Ever receive an email that prompts you to do something, then forget about it days later when it's buried in the depths of your inbox? Microsoft Outlook has a built-in way of reminding you.
While viewing the message (you have to double-click on it in the Inbox view), click on the red flag in the toolbar. You then can specify what you need to do with the message (follow-up, etc.) and you can set a deadline for yourself. Outlook will automatically notify you when the deadline hits.
Once you complete the task, you can click on that same red flag icon later on and check off the "Completed" box. Alternately, in your inbox view, you can simply click on the red flag in the right-hand column to change it to a check mark.
01 February 2006
The Hard Copy
This week, a few tips about printers.
[A] Adding a printer to your user account is easy. Here’s how you do it:
1. Click Start and select “Printers and Faxes”.
2. Select “Add a printer” from the left side of the window.
3. Click “Next”, then click “Next” again.
4. You want to “Find a printer in the directory”, which should be the default.
5. Click “Next”.
6. Now we’re going to search for a printer, but we’re not
going to enter in any search criteria, so click “Find Now”.
7. A list will appear that contains most of our network
printers. Double-click on the printer you want to add.
8. It will now ask you if you want this to be your “default
printer”. Select “Yes” or “No” as appropriate and click “Next”.
9. Click “Finish” and you’re done!
[B] Preview before you print!
Far too many people leave stacks and stacks of wasted printouts in print trays every single day. Not only is this practice environmentally-inconsiderate, but it wastes thousands of dollars every year. Consider this: printing on a color laser printer costs about 10 cents per page. Printing on a color inkjet printer can cost anywhere from 4 cents per page (text-only) all the way up to a full dollar per page when printing photos.
If you're unsure how your printout will look, don't print! Go to File/Print Preview in whatever application you're running. You'll get a graphic of exactly the way your printout will look. Once you've finally got things looking exactly right, then hit "Print".
[C] Inkjet ink...ignore the warnings!
If you're using an inkjet printer, you'll eventually get warnings that certain ink tanks/ink cartridges are "running low" and that you "need to replace" these cartridges. IGNORE THESE WARNINGS. They're most likely an attempt by the manufacturer to get you to purchase ink tanks/cartridges more often! You can continue to print normally for weeks after you first receive these messages. Only replace an inkjet cartridge when the printer states that the cartridge is totally empty and won't continue until you replace it. Your printouts will not suffer in quality during this period.
Also, once the ink tank for a particular color is empty, please just pull that one ink tank for replacement...not all 6 of them. The odds of all 6 ink tanks drying up at the exact same time are slim, yet people frequently try to replace all ink cartridges at the same time. Consider replacing them one at a time.
25 January 2006
GAL Phone Directory
Many of you have noticed that we’ve added phone extensions to the Global Address List. This serves as an electronic phone directory right at your fingertips. You can quickly look up a person's extension in one of three ways:
Hopefully this feature makes your workflow a little bit easier!
- Clicking on the Address Book button in any Outlook window and searching for their name. The icon looks like this:
 . In the main Outlook window, it's next to the tool that says "Type a contact to find".
 - If you get an email from that person, simply double-clicking their name in the "From:" field.
- Hitting the "To:" button in a new email.

Hopefully this feature makes your workflow a little bit easier!
18 January 2006
Presentations and Conference Rooms
When setting up for a presentation with a projector, ensure that the projector is set to the correct input device. A number of people call in for tech support when the projector doesn’t display what’s on the computer. Simply push the “INPUT” button on the projector’s remote control to switch input devices. (Often times, the projector is set to take input from a DVD player or VCR.) To switch the projector over to the DVD/VCR, simply push the “INPUT” button again.
If you are running your presentation from a laptop computer and the projector still isn't showing what's on the laptop screen, you probably need to switch the display mode. To do this, hold down the function key ("Fn") and hit F8. This switches the laptop between three display modes: laptop only, projector only, laptop and projector.
In conference rooms with a stereo system, you may also want to ensure that the stereo receiver is set to the correct input (either "computer" or "DVD/VCR") if audio is part of your presentation. In addition, if you find that the DVD/VCR won’t play your DVD or VHS tape, ensure that the correct side (DVD or VCR) is selected.
11 January 2006
Spam, Spam, Spam, Spam...
Getting fed up with spam email in your inbox? We don't block spam because our policy is not to block any employee from receiving any email. However, our eSafe server automatically strips away any malicious content (viruses, worms, trojan horses, etc.) that gets attached to a spam email, adds “*** Detected as Spam ***” to the subject line, then sends it on to the Exchange server for delivery.
So you “have to” receive these spam emails, but there is something you can do to save yourself the trouble of weeding them out of your inbox every day. Microsoft Outlook lets you “create a rule” that basically tells Outlook to automatically delete all email with “*** Detected as Spam ***” in the subject line.
Before explaining how to do this, I’ll add a word of caution: on a very rare occasion, the eSafe will mistake a non-spam email (from outside only) for spam. If you are expecting an email and don’t receive it, check in your Deleted Items folder for the email before the Deleted Items folder gets emptied. (If you feel that this process is too risky, in step 8 below, select the “Junk E-mail” folder instead of the “Deleted Items” folder. The “Junk E-mail” folder doesn’t get automatically emptied…you will have to empty it yourself after you’ve looked through it to ensure that there aren’t any legitimate emails in there.)
Here’s how to set this up:
- In the Inbox view of Outlook, click on Tools from the menu bar and select Rules and Alerts…
- Click the New Rule… button.
- Under Step 1, select the second option (“Move messages with specific words in the subject to a folder”).
- Under Step 2, click on "specific words".
- In the top box, type in “*** Detected as Spam ***”. Make sure you type this exactly as shown: no quotation marks, a space before the capital D, and a space after the lower-case m.
- Click the Add button and click OK.
- Under Step 2, click on "specified".
- Select the Deleted Items folder and click OK.
- Click Next > four times.
- Put a check mark next to "Run this rule now…"
- Click Finish.
- Click Apply, then click OK.
The system will now automatically funnel all email meeting the above criteria into your Deleted Items folder.
____________________________________________________________
Wife: Have you got anything without spam?
Waitress: Well, there's spam egg sausage and spam, that's not got much spam in it.
Wife: I don't want ANY spam!
Man: Why can't she have egg bacon spam and sausage?
Wife: THAT'S got spam in it!
Man: Hasn't got as much spam in it as spam egg sausage and spam, has it?
Vikings: Spam spam spam spam... (Crescendo through next few lines...)
from Monty Python's Flying Circus
04 January 2006
Scaling Down an Excel Spreadsheet for Printing
You can save a lot of paper, time, and frustration by using the scaling feature when you’re printing an Excel spreadsheet. Rather than simply hitting the print button and watching the printer crank out a 25-page “mural”, you can adjust the scale of what you’re printing so that it fits on far fewer pages.
To do this, first select the range of cells that you want to print. Then go to File/Print Area/Set Print Area. This tells Excel the specific cells that you want to print. Now go to File/Page Setup and look at the Page tab. Here you’ll find 3 ways of printing more efficiently:
To do this, first select the range of cells that you want to print. Then go to File/Print Area/Set Print Area. This tells Excel the specific cells that you want to print. Now go to File/Page Setup and look at the Page tab. Here you’ll find 3 ways of printing more efficiently:
- First decide if you want to print in Portrait or Landscape mode. If your spreadsheet won’t quite fit into the 8 ½” width of a printout, switching to landscape will give you an extra 2 ½” of width.
- You can specify the exact number of pages the spreadsheet will print out onto by selecting the radio button next to Fit to:. Now, you can choose the exact dimensions of your printout. If you want the spreadsheet to all fit on one page, then you would choose “1 page(s) wide by 1 tall”. Otherwise, you can let it run across several pages whichever way you like…1 by 2, 4 by 1, etc. Click OK when you’ve selected the appropriate size.
- Instead of Fit to:, you can select Adjust to: and give a zoom percentage like you would with a Xerox copy machine.
- Click on the Margins tab. The margins by default are usually pretty wide. You can gain a lot of real estate by bringing all four of these in.
If you used Fit to: to specify exact dimensions, you can go back and see what zoom percentage the computer needs to shrink your spreadsheet to make it fit within your given dimensions. Once again go to File/Page Setup. Now, on the Page tab, you’ll see the estimated percentage next to the option Adjust to:. Don’t select this option; it’s just for your information.
If the percentage is less than 50%, your printout may be unreadable without a magnifying glass! Consider other ways of trimming down your spreadsheet.
Finally, make sure you preview your printout before you send it to the printer. Go to File/Print Preview and you can see exactly how it looks. Getting it right before you print not only saves a tree, but it saves money as well!
Subscribe to:
Posts (Atom)
