Most computers now use optical mice, the ones that have a glowing red light beneath them. These are far more reliable and accurate than their predecessors, the mechanical mice (the ones that ride on a rubber ball).
Most people don’t realize this: an optical mouse doesn’t require a mouse pad. What an optical mouse does require is an opaque surface that is white or light in color. Also, optical mice sometimes have trouble tracking on a perfectly-solid-colored surface.
So if you’re using an all-black mouse pad with your optical mouse, you’re actually diminishing the performance of your mouse, not helping it! (The black mouse pads with the light-gray Dell logo in the center do work reasonably well, though.) In general, we recommend disposal of mouse pads unless a particular desk or keyboard tray surface won’t allow an optical mouse to track well.
Here's another reason to toss out your mouse pad: not only do mouse pads often reduce mouse accuracy, but they are usually loaded with germs and bacteria from years of use…a Petri dish for dirty hands. Using a paper towel, you can apply a small amount of hand disinfectant to the outside of a mouse to kill germs, but mouse pads are best left in the garbage.
03 March 2006
01 March 2006
Make Photos More Manageable
Sometimes digital photos are too big in size and resolution to be practical. Most photos that come straight from a digital camera are over 500 KB in size (roughly half a megabyte). Screen captures can also be pretty huge. Photos this large are usually too awkward for practical use. Not only is it inappropriate to send emails with attachments of more than 1 MB (roughly 1000 KB), large files can take up a ton of space in your profile, greatly slowing down your startup and shutdown times. Plus, inserting several large photos into a Word document will cause your whole computer to drag while trying to edit the document. Under most circumstances, your photos shouldn’t exceed 200 KB.
Here’s a trick I came up with to significantly reduce the size of several images at once. I admit that it is a strange and goofy technique, but I have yet to find a faster way of shrinking multiple photos:
1. Select a group of files (on your computer, in your My Photos folder, on the network, etc.).
2. Right-click on them and select Send To > and then select Mail Recipient. We’re going to pretend to email these photos, but stop short of actually sending them.
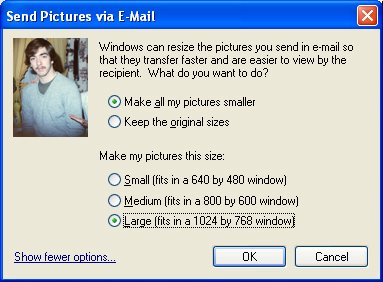
3. A window will pop up, asking you if you want to make the pictures smaller. Click on Show more options...
4. You can now choose one of three resizing schemes. Choose Large. (Medium is good if you’re looking to make postage stamps. Small is great if you're in the microfiche business.) Click OK.
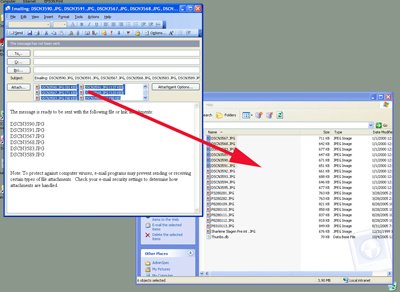
5. A new email message will pop up with your resized photos already attached. We’re not going to send this email. Instead, select all of the photos (you’ll see them next to the Attach... button). Now, drag these resized photos into the folder that holds your original photos.
6. Windows will now ask you if you want to replace each existing file with the new file. Click Yes to All.
7. Close out of the mail message and click No.
Presto! Your photos now take up as little as 1/10th the disk space that they used to! Open up each one…you’ll see that they will still have good resolution and color.
Here’s a trick I came up with to significantly reduce the size of several images at once. I admit that it is a strange and goofy technique, but I have yet to find a faster way of shrinking multiple photos:

1. Select a group of files (on your computer, in your My Photos folder, on the network, etc.).
2. Right-click on them and select Send To > and then select Mail Recipient. We’re going to pretend to email these photos, but stop short of actually sending them.

3. A window will pop up, asking you if you want to make the pictures smaller. Click on Show more options...
4. You can now choose one of three resizing schemes. Choose Large. (Medium is good if you’re looking to make postage stamps. Small is great if you're in the microfiche business.) Click OK.

5. A new email message will pop up with your resized photos already attached. We’re not going to send this email. Instead, select all of the photos (you’ll see them next to the Attach... button). Now, drag these resized photos into the folder that holds your original photos.
6. Windows will now ask you if you want to replace each existing file with the new file. Click Yes to All.
7. Close out of the mail message and click No.
Presto! Your photos now take up as little as 1/10th the disk space that they used to! Open up each one…you’ll see that they will still have good resolution and color.
Subscribe to:
Posts (Atom)
