29 August 2007

Freeze-Frame

The “screenshot” feature of Windows is a handy feature, particularly when you’re trying to teach how to do something on a computer. Taking a screenshot is just like taking a photo of what’s being displayed on your monitor. All you have to do is hit the Print Screen button on your keyboard and everything you see is captured to the clipboard. Then you can paste the screenshot into any application, such as Word or PowerPoint. Here are a few other screenshot tricks:

  • You can paste your screenshot into an email message. This is a nifty way of letting your IT staff know when you're getting an error message. E-mail them a screenshot of your issue so they can diagnose your problem faster!
  • To make a JPEG (JPG) file of your screenshot, open up the Paint application built into Windows. (Go to Start/All Programs/Accessories/Paint.) Select Edit/Paste to paste the screenshot onto your canvas. Then select File/Save As... to save the screenshot as an image file. The default is a bitmap file (BMP), which is very large and awkward in size. Change the “Save as type” to JPEG for a much more usable file.
  • You don’t have to take a snapshot of the entire screen if you don’t want to. Holding down the ALT key when you hit Print Screen will take a snapshot of just the active window!

22 August 2007

The Restart...It's Like Duct Tape

The greatest panacea for computer problems is the venerable “restart” (a.k.a. “reboot”). Often times, computer problems arise from conflicts in the computer’s memory between multiple programs running simultaneously. In addition, Microsoft Windows is notorious for “memory leak” issues: applications closing out but not erasing completely from memory, thus leaving data residue that takes up space. A simple restart flushes the computer's memory, resolving all these issues and many more. Restarting is like duct tape…it fixes everything! The next time your computer seems to be acting “funny”, do a restart before you call for IS service. You might save yourself (and us) a lot of time.

And on that note, please shut down your computer at the end of the day. That means more than just shutting off your monitor…you need to click Start/Shut Down and make sure “Shut Down” is selected before clicking “OK”. Not only will your computer be freshly-booted-up the next morning, but it extends the life of your PC. A computer that runs 24/7 will burn out sooner than one that gets a chance to rest…and downtime for your computer is downtime for your productivity!

15 August 2007

How to Remove the Annoying "Language Toolbar"

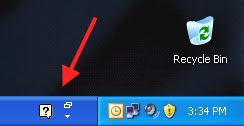
You may have something in the lower-right corner of your screen hogging some of your Taskbar space that looks like this:


This is a small application built into Microsoft Office called the Language Toolbar. There is a simple way of removing it.

1. Click on the tiny little down arrow ( ▼ ) that you see to the right of the question mark balloon. If you don't see the down arrow, follow the directions in the sidebar at the bottom of this Tech Tip.


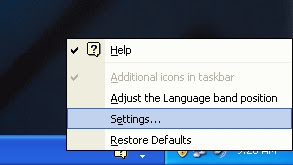
2. In the box that pops up, select Settings... :


3. Now a dialog box pops up:


Click on the Language Bar... button.

4. Another box pops up. Uncheck the box next to Show the Language bar on the desktop:


5. Click OK to close the box.

6. Click OK to close the previous box.

7. The Taskbar at the bottom of your screen is now gone. It will not reappear when you restart your computer.


SIDEBAR

If the Language Toolbar is active on your desktop but you can't see the little down arrow, you will need to do the following:

1. Right-click anywhere on your Taskbar and make sure "Lock the Taskbar" is unchecked in the box that pops up:


2. With the Taskbar unlocked, you'll see Taskbar dividers that are now visible. Drag the divider next to the Language Bar to the left to expose the entire Language Bar:


Now the little triangle should be visible, and you can continue with step 2 above.

08 August 2007

A Great Photo Editing Alternative

Windows users are often in a bind when it comes to photo editing software. Windows comes with a very simple built-in application called Paint. It lacks some of the most commonly-used photo editing features, including crop and red eye removal.

Meanwhile, third-party software solutions such as Adobe Photoshop cost between $75 and $500.

Earlier this year I discovered a free, open-source photo editing application that's rich with features. It's called Paint.net, and it can be found here:

http://www.getpaint.net/index2.html

I've been testing this piece of software and it works very well. It is a vast upgrade over Paint, and its feature set and ease-of-use are similar to Adobe Photoshop Elements. The download is only 1.3 MB and the installation is quick and seamless. I have had little difficulty learning how to use Paint.net, and have found that it has more than enough features to do common photo editing.

Please note that Paint.net is not available for Mac or Linux, and it is only compatible with Windows XP and Vista. (Older versions such as Win98 and WinME are not supported.)

01 August 2007

Install Updates and Shut Down? Yes!

It's always a good idea to shut down your computer at the end of each workday. Not only does it save energy and prolong the life of many of your PC's components, but it gives the computer an opportunity to restart the next day. This flushes the system memory and gives you a "clean slate" to work with the following day.


It also gives Windows an opportunity to automatically install the latest updates and security patches. You'll notice that sometimes, when you select Start / Shutdown, it gives you this box:


You should click OK when it asks you to install updates and shut down. Important Windows Updates are being sent out to your computer to improve security and reliability. Don't change this option if it pops up.

After clicking OK, you can walk away from your computer. It will automatically shut down after the updates are installed.